
Laravel WebSockets 🛰
WebSockets for Laravel. Done right.
Laravel WebSockets is a package for Laravel 5.7 and up that will get your application started with WebSockets in no-time! It has a drop-in Pusher API replacement, has a debug dashboard, realtime statistics and even allows you to create custom WebSocket controllers.
Once installed, you can start it with one simple command:
php artisan websockets:serve
If you want to know how all of it works under the hood, we wrote an in-depth blogpost about it.
To help you get started, you can also take a look at the demo repository, that implements a basic Chat built with this package.
Learn everything about Laravel Websockets
 Installation
Laravel WebSockets can be installed via composer:
composer require beyondcode/laravel-websockets
The package will automatically register a service provider.
This package comes with a migration to store statistic information while running your WebSocket server. You can publish the migration file using:
php artisan vendor:publish --provider="BeyondCode\LaravelWebSockets\WebSocketsServiceProvider" --tag="migrations"
Run the migrations with:
php artisan migrate
Next, you need to publish the WebSocket configuration file:
php artisan vendor:publish --provider="BeyondCode\LaravelWebSockets\WebSocketsServiceProvider" --tag="config"
This is the default content of the config file that will be published as config/websockets.php:
return [

        /*
         * This package comes with multi tenancy out of the box. Here you can
         * configure the different apps that can use the webSockets server.
         *
         * Optionally you can disable client events so clients cannot send
         * messages to each other via the webSockets.
         */
        'apps' => [
            [
                'id' => env('PUSHER_APP_ID'),
                'name' => env('APP_NAME'),
                'key' => env('PUSHER_APP_KEY'),
                'secret' => env('PUSHER_APP_SECRET'),
                'enable_client_messages' => false,
                'enable_statistics' => true,
            ],
        ],

        /*
         * This class is responsible for finding the apps. The default provider
         * will use the apps defined in this config file.
         *
         * You can create a custom provider by implementing the
         * `AppProvider` interface.
         */
        'app_provider' => BeyondCode\LaravelWebSockets\Apps\ConfigAppProvider::class,

        /*
         * This array contains the hosts of which you want to allow incoming requests.
         * Leave this empty if you want to accept requests from all hosts.
         */
        'allowed_origins' => [
            //
        ],

        /*
         * The maximum request size in kilobytes that is allowed for an incoming WebSocket request.
         */
        'max_request_size_in_kb' => 250,

        /*
         * This path will be used to register the necessary routes for the package.
         */
        'path' => 'laravel-websockets',

        'statistics' => [
            /*
             * This model will be used to store the statistics of the WebSocketsServer.
             * The only requirement is that the model should extend
             * `WebSocketsStatisticsEntry` provided by this package.
             */
            'model' => \BeyondCode\LaravelWebSockets\Statistics\Models\WebSocketsStatisticsEntry::class,

            /*
             * Here you can specify the interval in seconds at which statistics should be logged.
             */
            'interval_in_seconds' => 60,

            /*
             * When the clean-command is executed, all recorded statistics older than
             * the number of days specified here will be deleted.
             */
            'delete_statistics_older_than_days' => 60,

            /*
             * Use an DNS resolver to make the requests to the statistics logger
             * default is to resolve everything to 127.0.0.1.
             */
            'perform_dns_lookup' => false,
        ],

        /*
         * Define the optional SSL context for your WebSocket connections.
         * You can see all available options at: http://php.net/manual/en/context.ssl.php
         */
        'ssl' => [
            /*
             * Path to local certificate file on filesystem. It must be a PEM encoded file which
             * contains your certificate and private key. It can optionally contain the
             * certificate chain of issuers. The private key also may be contained
             * in a separate file specified by local_pk.
             */
            'local_cert' => null,

            /*
             * Path to local private key file on filesystem in case of separate files for
             * certificate (local_cert) and private key.
             */
            'local_pk' => null,

            /*
             * Passphrase for your local_cert file.
             */
            'passphrase' => null
        ],
    ];
Pusher Replacement
The easiest way to get started with Laravel WebSockets is by using it as a Pusher replacement. The integrated WebSocket and HTTP Server has complete feature parity with the Pusher WebSocket and HTTP API. In addition to that, this package also ships with an easy to use debugging dashboard to see all incoming and outgoing WebSocket requests.
Requirements#
To make use of the Laravel WebSockets package in combination with Pusher, you first need to install the official Pusher PHP SDK.
If you are not yet familiar with the concept of Broadcasting in Laravel, please take a look at the Laravel documentation.
composer require pusher/pusher-php-server "~3.0"
Next, you should make sure to use Pusher as your broadcasting driver. This can be achieved by setting the BROADCAST_DRIVER environment variable in your .env file:
BROADCAST_DRIVER=pusher
Pusher Configuration#
When broadcasting events from your Laravel application to your WebSocket server, the default behavior is to send the event information to the official Pusher server. But since the Laravel WebSockets package comes with its own Pusher API implementation, we need to tell Laravel to send the events to our own server.
To do this, you should add the host and port configuration key to your config/broadcasting.php and add it to the pusher section. The default port of the Laravel WebSocket server is 6001.
'pusher' => [
        'driver' => 'pusher',
        'key' => env('PUSHER_APP_KEY'),
        'secret' => env('PUSHER_APP_SECRET'),
        'app_id' => env('PUSHER_APP_ID'),
        'options' => [
            'cluster' => env('PUSHER_APP_CLUSTER'),
            'encrypted' => true,
            'host' => '127.0.0.1',
            'port' => 6001,
            'scheme' => 'http'
        ],
    ],
Configuring WebSocket Apps#
The Laravel WebSocket Pusher replacement server comes with multi-tenancy support out of the box. This means that you could host it independently from your current Laravel application and serve multiple WebSocket applications with one server.
To make the move from an existing Pusher setup to this package as easy as possible, the default app simply uses your existing Pusher configuration.
::: warning Make sure to use the same app id, key and secret as in your broadcasting configuration section. Otherwise broadcasting events from Laravel will not work. :::
::: tip When using Laravel WebSockets as a Pusher replacement without having used Pusher before, it does not matter what you set as your PUSHER_ variables. Just make sure they are unique for each project. :::
You may add additional apps in your config/websockets.php file.
'apps' => [
        [
            'id' => env('PUSHER_APP_ID'),
            'name' => env('APP_NAME'),
            'key' => env('PUSHER_APP_KEY'),
            'secret' => env('PUSHER_APP_SECRET'),
            'enable_client_messages' => false,
            'enable_statistics' => true,
        ],
    ],
Client Messages#
For each app in your configuration file, you can define if this specific app should support a client-to-client messages. Usually all WebSocket messages go through your Laravel application before they will be broadcasted to other users. But sometimes you may want to enable a direct client-to-client communication instead of sending the events over the server. For example, a "typing" event in a chat application.
It is important that you apply additional care when using client messages, since these originate from other users, and could be subject to tampering by a malicious user of your site.
To enable or disable client messages, you can modify the enable_client_messages setting. The default value is false.
Statistics#
The Laravel WebSockets package comes with an out-of-the-box statistic solution that will give you key insights into the current status of your WebSocket server.
To enable or disable the statistics for one of your apps, you can modify the enable_statistics setting. The default value is true.
Usage with Laravel Echo#
The Laravel WebSockets package integrates nicely into Laravel Echo to integrate into your frontend application and receive broadcasted events. If you are new to Laravel Echo, be sure to take a look at the official documentation.
To make Laravel Echo work with Laravel WebSockets, you need to make some minor configuration changes when working with Laravel Echo. Add the wsHost and wsPort parameters and point them to your Laravel WebSocket server host and port.
By default, the Pusher JavaScript client tries to send statistic information - you should disable this using the disableStats option.
::: tip When using Laravel WebSockets in combination with a custom SSL certificate, be sure to use the encrypted option and set it to true. :::
import Echo from "laravel-echo"

    window.Pusher = require('pusher-js');

    window.Echo = new Echo({
        broadcaster: 'pusher',
        key: 'your-pusher-key',
        wsHost: window.location.hostname,
        wsPort: 6001,
        forceTLS: false,
        disableStats: true
    });
Now you can use all Laravel Echo features in combination with Laravel WebSockets, such as Presence Channels, Notifications and Client Events.
Starting the WebSocket server
Once you have configured your WebSocket apps and Pusher settings, you can start the Laravel WebSocket server by issuing the artisan command:
php artisan websockets:serve
Using a different port#
The default port of the Laravel WebSocket server is 6001. You may pass a different port to the command using the --port option.
php artisan websockets:serve --port=3030
This will start listening on port 3030.
Restricting the listening host#
By default, the Laravel WebSocket server will listen on 0.0.0.0 and will allow incoming connections from all networks. If you want to restrict this, you can start the server with a --host option, followed by an IP.
For example, by using 127.0.0.1, you will only allow WebSocket connections from localhost.
php artisan websockets:serve --host=127.0.0.1
Keeping the socket server running with supervisord#
The websockets:serve daemon needs to always be running in order to accept connections. This is a prime use case for supervisor, a task runner on Linux.
First, make sure supervisor is installed.
On Debian / Ubuntu
apt install supervisor
On Red Hat / CentOS
yum install supervisor
systemctl enable supervisord
Once installed, add a new process that supervisor needs to keep running. You place your configurations in the /etc/supervisor/conf.d (Debian/Ubuntu) or /etc/supervisord.d (Red Hat/CentOS) directory.
Within that directory, create a new file called websockets.conf.
[program:websockets]
command=/usr/bin/php /home/laravel-echo/laravel-websockets/artisan websockets:serve
numprocs=1
autostart=true
autorestart=true
user=laravel-echo
Once created, instruct supervisor to reload its configuration files (without impacting the already running supervisor jobs).
supervisorctl update
supervisorctl start websockets
Your echo server should now be running (you can verify this with supervisorctl status). If it were to crash, supervisor will automatically restart it.
Please note that, by default, supervisor will force a maximum number of open files onto all the processes that it manages. This is configured by the minfds parameter in supervisord.conf.
If you want to increase the maximum number of open files, you may do so in /etc/supervisor/supervisord.conf (Debian/Ubuntu) or /etc/supervisord.conf (Red Hat/CentOS):
[supervisord]
minfds=10240; (min. avail startup file descriptors;default 1024)
After changing this setting, you'll need to restart the supervisor process (which in turn will restart all your processes that it manages).
SSL Support
Since most of the web's traffic is going through HTTPS, it's also crucial to secure your WebSocket server. Luckily, adding SSL support to this package is really simple.
Configuration#
The SSL configuration takes place in your config/websockets.php file. The default configuration has a SSL section that looks like this:
    'ssl' => [
        /*
         * Path to local certificate file on filesystem. It must be a PEM encoded file which
         * contains your certificate and private key. It can optionally contain the
         * certificate chain of issuers. The private key also may be contained
         * in a separate file specified by local_pk.
         */
        'local_cert' => null,

        /*
         * Path to local private key file on filesystem in case of separate files for
         * certificate (local_cert) and private key.
         */
        'local_pk' => null,

        /*
         * Passphrase with which your local_cert file was encoded.
         */
        'passphrase' => null
    ],
But this is only a subset of all the available configuration options. This packages makes use of the official PHP SSL context options.
So if you find yourself in the need of adding additional configuration settings, take a look at the PHP documentation and simply add the configuration parameters that you need.
After setting up your SSL settings, you can simply (re)start your WebSocket server using:
php artisan websockets:serve
Client configuration#
When your SSL settings are in place and working, you still need to tell Laravel Echo that it should make use of it. You can do this by specifying the forceTLS property in your JavaScript file, like this:
 import Echo from "laravel-echo"

    window.Pusher = require('pusher-js');

    window.Echo = new Echo({
        broadcaster: 'pusher',
        key: 'your-pusher-key',
        wsHost: window.location.hostname,
        wsPort: 6001,
        disableStats: true,
        forceTLS: true
    });
Server configuration#
When broadcasting events from your Laravel application to the WebSocket server, you also need to tell Laravel to make use of HTTPS instead of HTTP. You can do this by setting the scheme option in your config/broadcasting.php file to https:
    'pusher' => [
        'driver' => 'pusher',
        'key' => env('PUSHER_APP_KEY'),
        'secret' => env('PUSHER_APP_SECRET'),
        'app_id' => env('PUSHER_APP_ID'),
        'options' => [
            'cluster' => env('PUSHER_APP_CLUSTER'),
            'host' => '127.0.0.1',
            'port' => 6001,
            'scheme' => 'https'
        ],
    ],
Since the SSL configuration can vary quite a lot, depending on your setup, let's take a look at the most common approaches.
Usage with Laravel Valet#
Laravel Valet uses self-signed SSL certificates locally. To use self-signed certificates with Laravel WebSockets, here's how the SSL configuration section in your config/websockets.php file should look like.
::: tip Make sure that you replace YOUR-USERNAME with your Mac username and VALET-SITE.TLD with the host of the Valet site that you're working on right now. For example laravel-websockets-demo.test. :::
    'ssl' => [
        /*
         * Path to local certificate file on filesystem. It must be a PEM encoded file which
         * contains your certificate and private key. It can optionally contain the
         * certificate chain of issuers. The private key also may be contained
         * in a separate file specified by local_pk.
         */
        'local_cert' => '/Users/YOUR-USERNAME/.config/valet/Certificates/VALET-SITE.TLD.crt',

        /*
         * Path to local private key file on filesystem in case of separate files for
         * certificate (local_cert) and private key.
         */
        'local_pk' => '/Users/YOUR-USERNAME/.config/valet/Certificates/VALET-SITE.TLD.key',

        /*
         * Passphrase with which your local_cert file was encoded.
         */
        'passphrase' => null,

        'verify_peer' => false,
    ],
Next, you need to adjust the config/broadcasting.php file to make use of a secure connection when broadcasting messages from Laravel to the WebSocket server.
You also need to disable SSL verification.
'pusher' => [
        'driver' => 'pusher',
        'key' => env('PUSHER_APP_KEY'),
        'secret' => env('PUSHER_APP_SECRET'),
        'app_id' => env('PUSHER_APP_ID'),
        'options' => [
            'cluster' => env('PUSHER_APP_CLUSTER'),
            'host' => '127.0.0.1',
            'port' => 6001,
            'scheme' => 'https',
            'curl_options' => [
                CURLOPT_SSL_VERIFYHOST => 0,
                CURLOPT_SSL_VERIFYPEER => 0,
            ]
        ],
    ],
Last but not least, you still need to configure Laravel Echo to also use WSS on port 6001.
 window.Echo = new Echo({
        broadcaster: 'pusher',
        key: 'your-pusher-key',
        wsHost: window.location.hostname,
        wsPort: 6001,
        wssPort: 6001,
        disableStats: true,
    });
Usage with a reverse proxy (like Nginx)#
Alternatively, you can also use a proxy service - like Nginx, HAProxy or Caddy - to handle the SSL configurations and proxy all requests in plain HTTP to your echo server.
A basic Nginx configuration would look like this, but you might want to tweak the SSL parameters to your liking.
server {
      listen        443 ssl;
      listen        [::]:443 ssl;
      server_name   socket.yourapp.tld;

      # Start the SSL configurations
      ssl                  on;
      ssl_certificate      /etc/letsencrypt/live/socket.yourapp.tld/fullchain.pem;
      ssl_certificate_key  /etc/letsencrypt/live/socket.yourapp.tld/privkey.pem;

      location / {
        proxy_pass             http://127.0.0.1:6001;
        proxy_read_timeout     60;
        proxy_connect_timeout  60;
        proxy_redirect         off;

        # Allow the use of websockets
        proxy_http_version 1.1;
        proxy_set_header Upgrade $http_upgrade;
        proxy_set_header Connection 'upgrade';
        proxy_set_header Host $host;
        proxy_cache_bypass $http_upgrade;
      }
    }
You can now talk HTTPS to socket.yourapp.tld. You would configure your config/broadcasting.php like the example above, treating your socket server as an https endpoint.
Same location for websockets and web contents#
To have the websockets be served at the same location and port as your other web content, Nginx can be taught to map incoming requests based on their type to special sub-locations.
map $http_upgrade $type {
      default "web";
      websocket "ws";
    }

    server {
      # Your default configuration comes here...

      location / {
        try_files /nonexistent @$type;
      }

      location @web  {
        try_files $uri $uri/ /index.php?$query_string;
      }

      location @ws  {
        proxy_pass             http://127.0.0.1:6001;
        proxy_set_header Host  $host;
        proxy_read_timeout     60;
        proxy_connect_timeout  60;
        proxy_redirect         off;

        # Allow the use of websockets
        proxy_http_version 1.1;
        proxy_set_header Upgrade $http_upgrade;
        proxy_set_header Connection 'upgrade';
        proxy_set_header Host $host;
        proxy_cache_bypass $http_upgrade;
      }
    }
This configuration is useful if you do not want to open multiple ports or you are restricted to which ports are already opened on your server. Alternatively, a second Nginx location can be used on the server-side, while the Pusher configuration wsPath can be used on the client-side (note: "pusher-js": ">=4.2.2" is required for this configuration option).
server {
      # Your default configuration comes here...

      location /ws {
        proxy_pass             http://127.0.0.1:6001;
        proxy_set_header Host  $host;
        proxy_read_timeout     60;
        proxy_connect_timeout  60;
        proxy_redirect         off;

        # Allow the use of websockets
        proxy_http_version 1.1;
        proxy_set_header Upgrade $http_upgrade;
        proxy_set_header Connection 'upgrade';
        proxy_set_header Host $host;
        proxy_cache_bypass $http_upgrade;
      }
    }
Nginx worker connections#
Note that you might need to increase the amount of worker_connections in Nginx. Your WebSocket connections will now be sent to Nginx, which in turn will send those along to the websocket server.
By default, that will have a sane limit of 1024 connections. If you are expecting more concurrent connections to your WebSockets, you can increase this in your global nginx.conf.
    events {
        worker_connections  1024;
    }
You know you've reached this limit of your Nginx error logs contain similar messages to these:
[alert] 1024 worker_connections are not enough while connecting to upstream
Remember to restart your Nginx after you've modified the worker_connections.
Example using Caddy#
Caddy can also be used to automatically obtain a TLS certificate from Let's Encrypt and terminate TLS before proxying to your echo server.
An example configuration would look like this:
    socket.yourapp.tld {
        rewrite / {
            if {>Connection} has Upgrade
            if {>Upgrade} is websocket
            to /websocket-proxy/{path}?{query}
        }

        proxy /websocket-proxy 127.0.0.1:6001 {
            without /special-websocket-url
            transparent
            websocket
        }

        tls youremail.com
    }
Note the to /websocket-proxy, this is a dummy path to allow the proxy directive to only proxy on websocket connections. This should be a path that will never be used by your application's routing. Also, note that you should change 127.0.0.1 to the hostname of your websocket server. For example, if you're running in a Docker environment, this might be the container name of your websocket server.
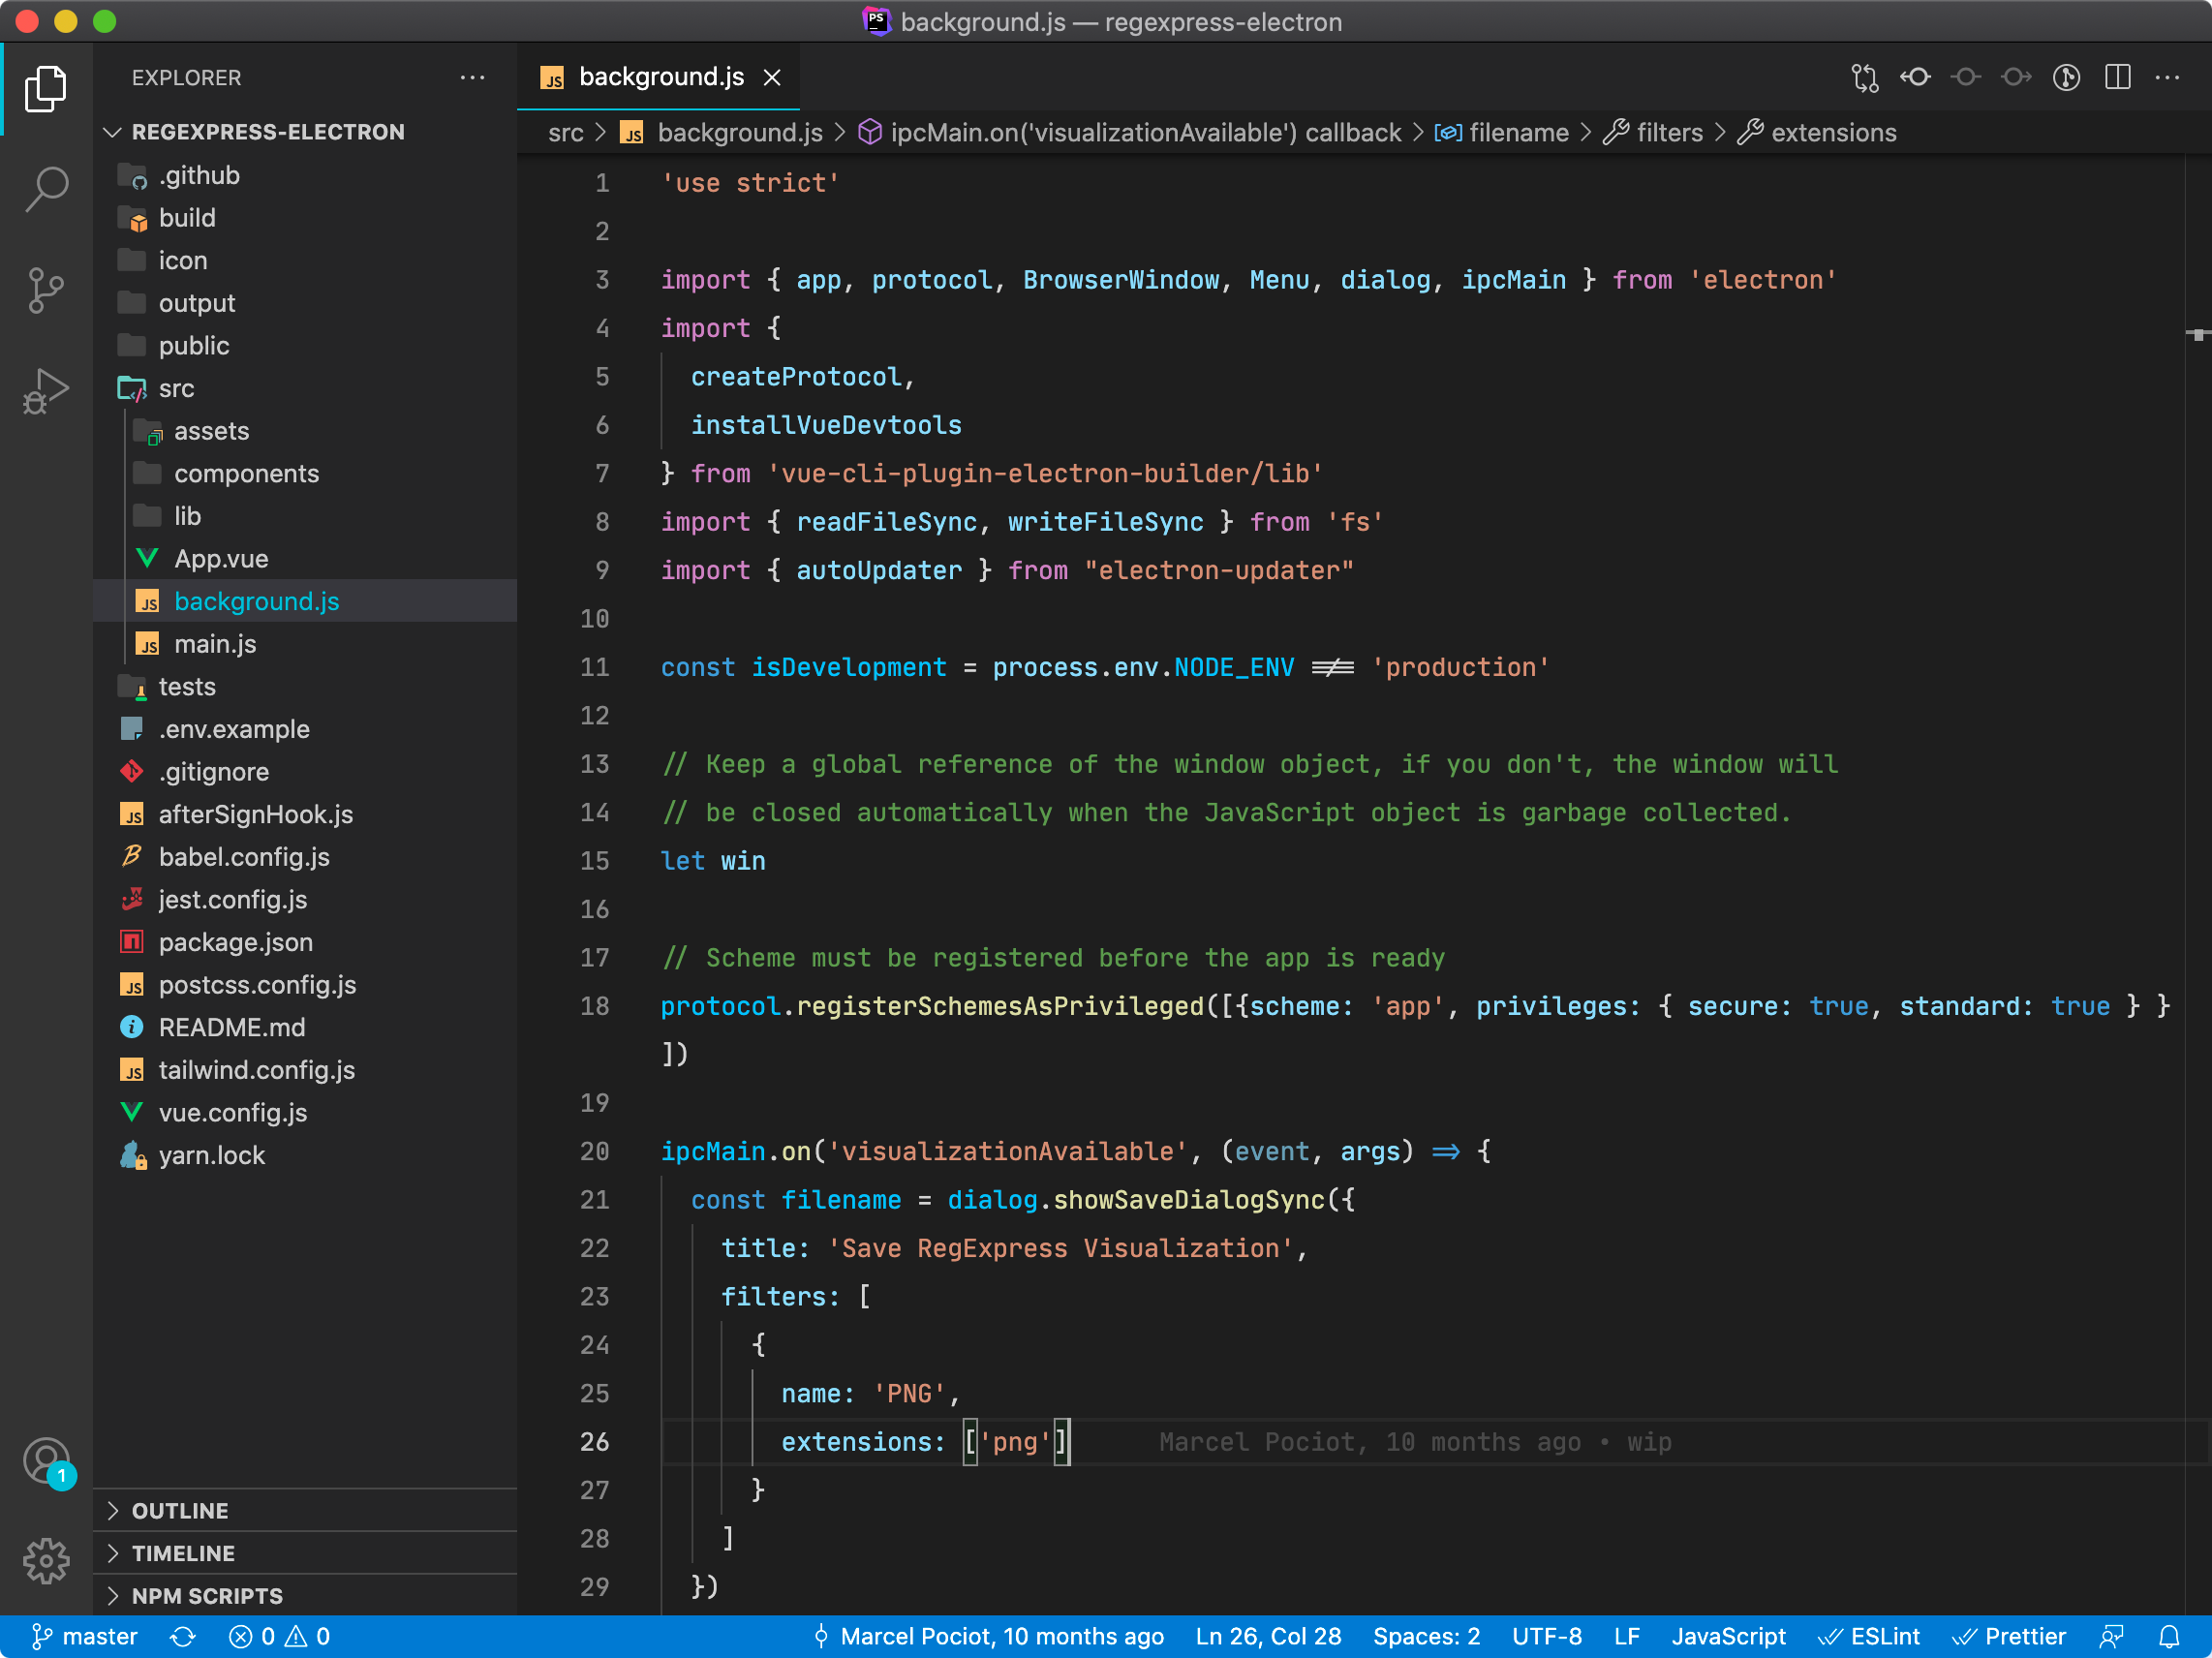
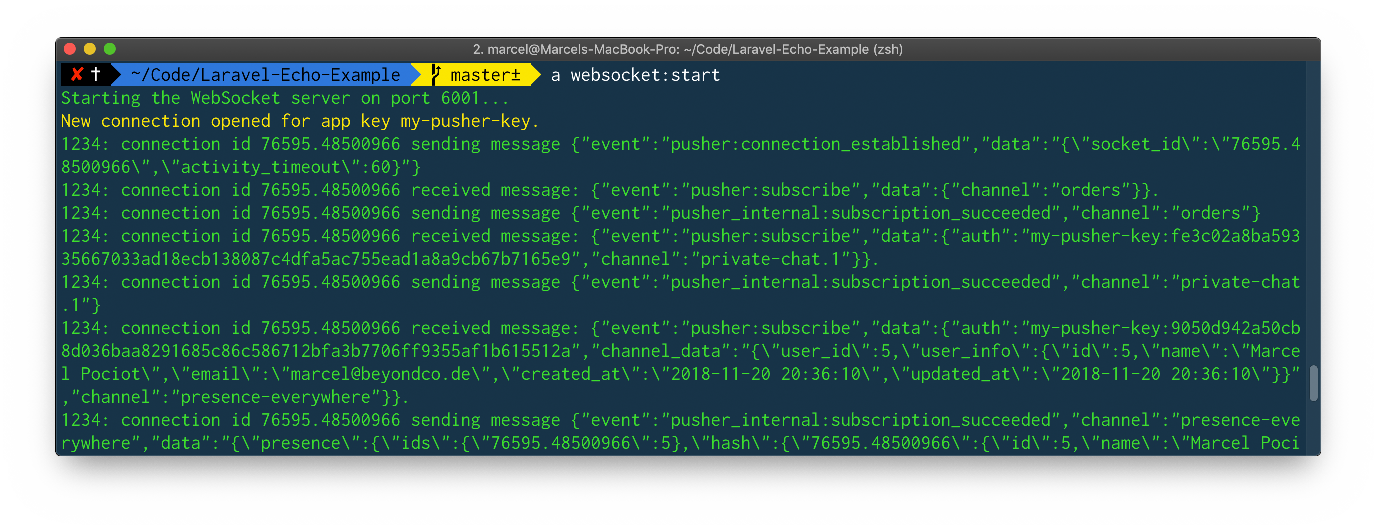
Console Logging
When you start the Laravel WebSocket server and your application is in debug mode, you will automatically see all incoming and outgoing WebSocket events in your terminal.
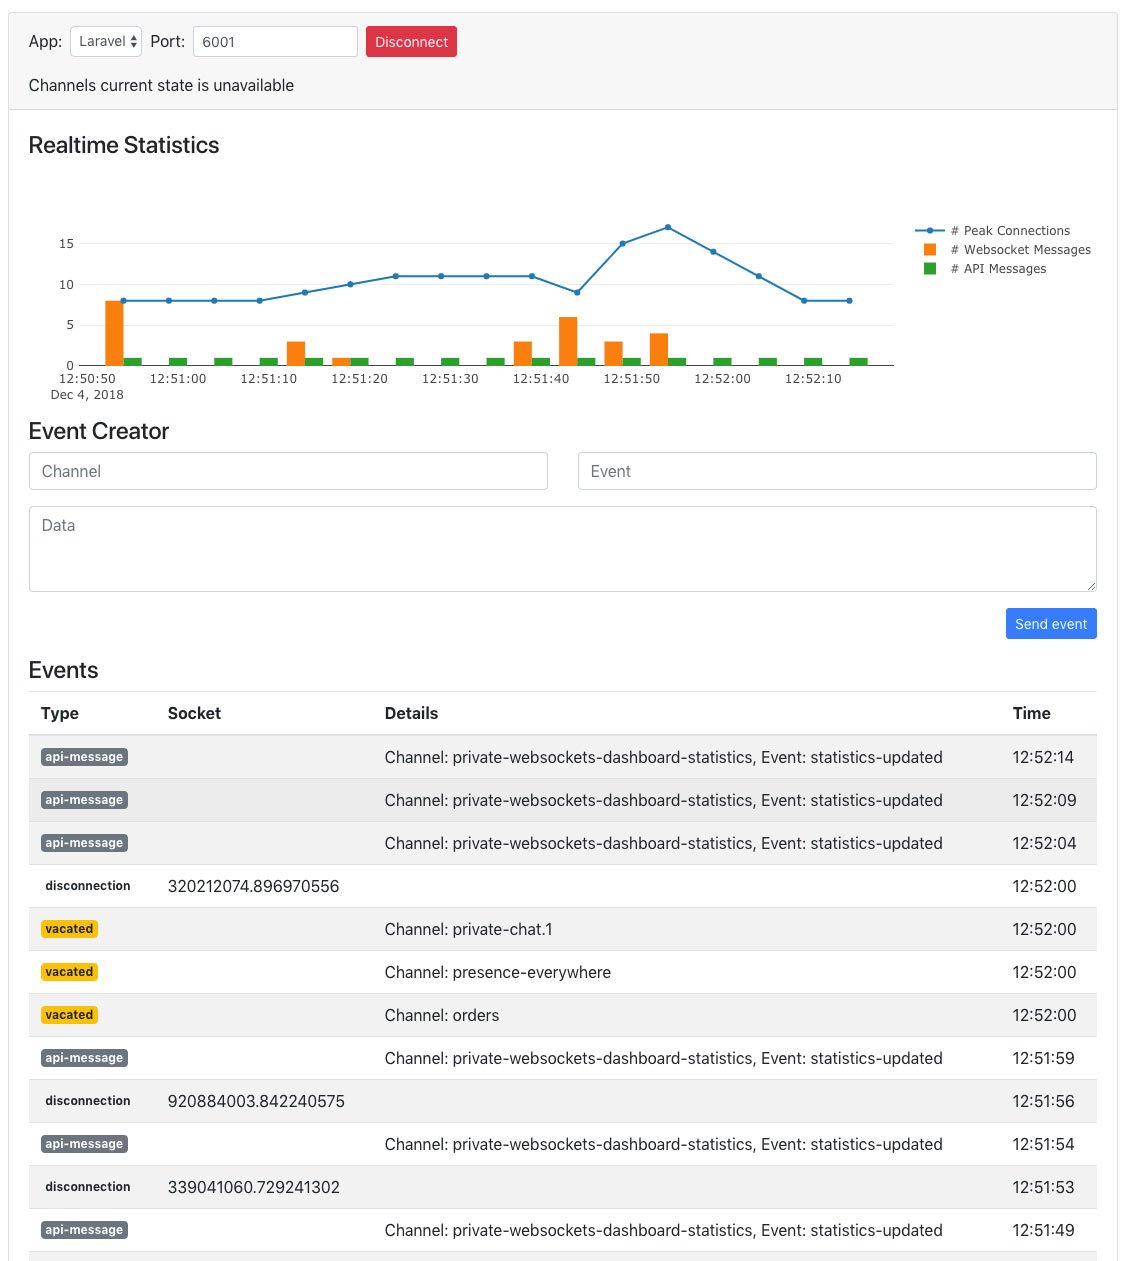
Debug Dashboard
In addition to logging the events to the console, you can also use a real-time dashboard that shows you all incoming connections, events and disconnects the moment they happen on your WebSocket server.
Accessing the Dashboard#
The default location of the WebSocket dashboard is at /laravel-websockets. The routes get automatically registered. If you want to change the URL of the dashboard, you can configure it with the path setting in your config/websockets.php file.
To access the debug dashboard, you can visit the dashboard URL of your Laravel project in the browser. Since your WebSocket server has support for multiple apps, you can select which app you want to connect to and inspect.
By pressing the "Connect" button, you can establish the WebSocket connection and see all events taking place on your WebSocket server from there on in real-time.
Note: Be sure to set the APP_URL env variable to match the current URL where your project is running to be sure the stats graph works properly.
Protecting the Dashboard#
By default, access to the WebSocket dashboard is only allowed while your application environment is set to local.
However, you can change this behavior by overriding the Laravel Gate being used. A good place for this is the AuthServiceProvider that ships with Laravel.
public function boot()
{
    $this->registerPolicies();

    Gate::define('viewWebSocketsDashboard', function ($user = null) {
        return in_array($user->email, [
            //
        ]);
    });
}
Statistics#
This package allows you to record key metrics of your WebSocket server. The WebSocket server will store a snapshot of the current number of peak connections, the amount of received WebSocket messages and the amount of received API messages defined in a fixed interval. The default setting is to store a snapshot every 60 seconds.
In addition to simply storing the statistic information in your database, you can also see the statistics as they happen in real-time on the debug dashboard.

You can modify this interval by changing the interval_in_seconds setting in your config file.
Cleanup old Statistics#
After using the WebSocket server for a while you will have recorded a lot of statistical data that you might no longer need. This package provides an artisan command websockets:clean to clean these statistic log entries.
Running this command will result in the deletion of all recorded statistics that are older than the number of days specified in the delete_statistics_older_than_days setting of the config file.
You can leverage Laravel's scheduler to run the clean up command now and then.
//app/Console/Kernel.php
protected function schedule(Schedule $schedule)
{
   $schedule->command('websockets:clean')->daily();
}
Event Creator#
The dashboard also comes with an easy-to-use event creator, that lets you manually send events to your channels.
Simply enter the channel, the event name and provide a valid JSON payload to send it to all connected clients in the given channel.